Jack-O-Lantern Cookie Dough Pops

20131021-140530.jpg

Another cookie dough craving hit me.

To change it up, I used mini M&M’s this time instead of chocolate chips.

I rolled them into balls and froze them like usual, then my husband and I ate most of them.

I have no shame.

20131021-140452.jpg

With only 10 balls remaining, I finally got around to finishing them.

I dipped pop sticks into green candy melts, making sure to get the candy melts up a little higher than I usually would. Once I stuck them into the balls, a little green poked out, making the pumpkin’s stem.

20131021-140507.jpg

Then I dipped the rest of the ball into orange candy melts and let it set up.

Using a black food coloring pen, I drew silly and scary jack-o-lantern faces on them.

20131021-140518.jpg

Easy and cute! (And yummy. Duh.)

20131021-140538.jpg

… and here are a couple more pics of my Halloween adventures so far. And the reason why this is the only treat I have time to make thus far…

20131021-140552.jpg 20131021-140606.jpg

2 Comments

Filed under Misc

Baby Franklin is Here!

Apologies for my short absence, but my little one has arrived!

Introducing:

20131007-130427.jpg

Carter Ray Davis Franklin

He was born on Saturday September 28, 2013 at 4:12 pm.

He weighed 9 lbs and was 20 inches long.

20131007-130525.jpg

The labor went very well. Start to finish it was about 13 hours, only 6 of which were really rough. We ended up having an all natural water birth, just as I was hoping. 🙂

So far he’s a very laid back little guy. Doesn’t cry much and likes to sleep in good 3-4 hour chunks. And MAN can he eat!

563125_10102136469674473_1860860546_n

I’m home from work for a while, but haven’t felt up to making anything yet. The urge is coming soon though, I can tell!

Thanks for being patient with me friends. 🙂

563991_10102139356868513_2060625759_n

9 Comments

Filed under Uncategorized

Snickerdoodle Cupcakes


Best. Cupcakes. Ever.

I have been wanting to make these for a while, I’m not sure why I didn’t sooner. Especially since my brother was begging me to make him Snickerdoodle anything.

We were going out to dinner for my girlfriend’s birthday and I was craving baking. Didn’t really matter what – I just needed to make something! I asked my girlfriend what she would like me to make her, and she chose cupcakes. Easy enough! I gave her a few flavor ideas I have had stored away, and she picked Snickerdoodle. Thank you to her. They turned out fabulous.

Don’t be afraid of the amount of ingredients or the steps. These are so good that they’re worth it.

Snickerdoodle Cupcakes – makes about 15 cupcakes

Ingredients:

1 1/4 cups cake flour (OR 1 cup + 1 tbsp + 1 1/2 tsp flour and 2 tbsp + 1 1/2 tsp cornstarch)

1 1/4 tsp baking powder

1/2 tsp baking soda

1/2 tsp salt

1 tsp cinnamon

1/2 cups milk

1/2 tsp white vinegar

2 eggs

3/4 cups sugar

2 tsp vanilla

1/2 cup oil


Directions:

1. Whisk together the flour, baking powder and soda, salt, and cinnamon. Set aside.

20130914-200630.jpg

2. Measure the vinegar into a glass, then pour the milk on top of it. Let stand for at least 5 minutes.

3. Beat eggs for about 20 seconds, then slowly add the sugar. Add the vanilla, followed by the oil, and beat until fully combined.

4. Turn the mixer to the slowest speed, and slowly add the flour mixture and milk, alternating between the two. You don’t want it to get too thick or too runny in between.

5. Line a cupcake pan with liners and fill each about 1/2 way. Do not overfill!

6. Bake at 350* for 18 minutes. Touching the top of the cupcake, it should spring back when it’s fully baked.

7. Let cool for 5 minutes in the pan, then move to a wire rack to cool completely.

20130914-200636.jpg

(My girlfriend also used the opportunity of having all her family and friends together to announce the sex of their upcoming baby! I wrapped the cupcakes in pink and blue for the occasion.)

20130914-200641.jpg

My kitchen smelled amazing at this point. And they came out so perfectly golden brown!

20130914-200724.jpg

For the frosting I made my Easy Buttercream Recipe, and added 1/8 tsp of cinnamon. I piped easy swirls, then sprinkled a little bit of cinnamon sugar over each.

20130914-200743.jpg

So the last question is, is it a BOY?

20130914-200737.jpg

… or is it a GIRL?

20130914-200731.jpg

Here’s the Mama with her cupcake, letting us all know!


20130917-160938.jpg

5 Comments

Filed under Cakes

Chocolate Caramel Krispies

These are super fast & easy to make and pretty darn tasty…

I started with the basic Rice Krispies Treats recipe (found here) but added 1 cup of chocolate to the melting mixture. Once it was almost completely melted, add 1 packet of Duncan Hines Flavor Creations. For these I used Caramel.

20130906-063746.jpg

Once the melty mixture was all stirred up with the Krispies, I sprayed my hands with non-stick spray and pressed the mixture into the pan. Then I sprinkled the top with mini chocolate chips and pressed them in gently to make sure they stuck well.

20130906-063752.jpg Then just let them cool before you cut and serve!

20130906-063757.jpg

Other Duncan Hines Flavor Creations would pair well with these chocolate krispies too – Mint Chocolate, Cherry Vanilla, Mocha, Orange Creme, even Strawberry Shortcake!

6 Comments

Filed under Misc

Mickey Cookies

One of my favorite little boys, Mikey, turned 2 a couple weeks back! Mama decided to throw a Mickey themed birthday party, since it’s one of his current obsessions.

Needless to say, I was STOKED to make these!

This is the cutter set I used, bought for me a while back in Disneyland by one of my best friends!

The shorts cutter was purchased here.

20130906-213439.jpg

I googled Mickey Mouse’s signature, then practiced over and over on wax paper until I could write “Mikey” in the same font.

20130906-213452.jpg

I hope I get to make Minnie ones one of these days! Maybe if I have a girl? 😉

Here are some other treats I have made for Mikey in the past:

Blue’s Clues Party

Baby Shower Cupcakes, Baby Shower Cookie Favors 

2 Comments

Filed under Cookies

Lollipop Cookies

My second baby shower’s theme was “She is about to POP!” My girls know how obsessed with bright colors I am, so they chose bright bright shades of pink, green, blue, yellow, purple, and orange.

20130824-120456.jpg

I made cake pops and kettle corn, as well as these Lollipop Cookies. (The cake pops were funfetti, and all coated in white candy melts, then topped with bright jimmies in all the coordinating colors. I ddn’t have time time take pictures before the party, and then it was so hot outside that they all got melty and slid down their sticks. Too messy for photo taking, but still delicious!)

20130824-120431.jpg

I was feeling lazy (and crunched for time) when it came time to decorate these, so I skipped the outlining step and made the icing thicker than normal. Then all we had to do was pipe a swirl onto the cookie, and then repeat in the other colors.

20130824-120442.jpg

Once they were wrapped like lollipops they looked adorable!

20130824-120450.jpg

Even the cleanup was pretty. 🙂

20130824-120503.jpg

5 Comments

Filed under Cookies

Soft & Chewy Peanut Butter M&M Cookies

As much as I fell in love with my Perfect M&M Cookies, it’s possible that I love these more.

20130824-120238.jpg

A coworker said my Perfect M&M Cookie was “okay.” I definitely appreciate honest feedback, but I wanted to know from him what would have made it amazing. Turns out the problem wasn’t my cookie, it just wasn’t his type of cookie. His type of cookie is peanut butter. So I told him all about my Peanut Butter Surprise Cookies and of course he wanted me to make them soon.

About a week later, he asked me to make him a whole batch of cookies to take with him to a little friend reunion party thing he was going to. He also told me that he was going to claim them as his own. I knew no one would believe him so I didn’t mind. 😉

I knew I wanted to do a peanut butter cookie base, but I wanted to try something different than the Reese’s inside. Ultimately I decided to do M&M’s because 1- he had a criticism for my last M&M cookie, and 2- I liked the fact that the candy would be mixed throughout the cookie and not just in the center. Of course, I had to go with peanut butter M&M’s this time. (I know you’re probably wondering why I didn’t just use Reese’s Pieces… the answer is because I’m not a fan. Besides, peanut butter M&M’s are bigger.)

20130824-120206.jpg

I followed the cookie dough recipe from my Peanut Butter Surprise Cookies, except I stirred in about 1 1/2 cups of peanut butter M&M’s at the end. I used a cookie scoop to make sure I had uniform sized cookies, and baked at 300* for 15 minutes.

20130824-120220.jpg

For these cookies, baking at a lower temperature for longer makes them so perfectly soft and chewy. They look a little puffy and under-cooked when they come out of the oven, but as they cool on the cookie sheet they settle and set up.

20130824-120229.jpg

These cookies are best when eaten within 2 days, but can be stored in an airtight container for up to a week or so.

8 Comments

Filed under Cookies

Gender Reveal Funfetti Cupcakes

I’m going to start off by getting politically correct. I only named this post “Gender Reveal” because that’s the term everyone uses, that’s how it’ll be searched, and that’s how people are going to know what I’m talking about. People throw around the terms “sex” and “gender” as if they’re the same thing – but they are not.

The correct term for this party should be “Sex Reveal Party” because that’s what you find out when you’re pregnant – the sex of the baby. Sex is literally the physical body parts. Gender on the other hand, is how the person identifies. For most people, their sex and gender are aligned. In some rare instances, the person truly deep down feels like they should have been born with the opposite body parts because they feel like the opposite sex on the inside. Since we obviously can’t tell what the baby’s gender will be while it’s still in utero, we should only ever be referring to their sex.

Anyway….

I got the amazing opportunity to be the baker for a friend’s sex reveal party. Mama-to-be and Daddy-to-be did not even know the sex, so the tech actually sent me an email directly to let me know the color for the big surprise!

I just found the best ever Homemade Funfetti Recipe, and Mama-to-be requested funfetti, so it was perfect! (I’m not going to list the ingredients and directions here since I just posted it, but go check it out if you want to make some awesome funfetti!!)

The best thing about funfetti from scratch is that you can have whatever colored sprinkles you want. I added just pink and blue for these special cupcakes.

20130730-194143.jpg

After baking them, I used a melon baller to core out a hole in the top of just 3 of the cupcakes. Then I made my Easy Buttercream Recipe, colored a small amount, and squeeze it into the hole.

20130730-194153.jpg

Since I was topping these with white frosting, and I didn’t want the color to seep into the white and ruin the surprise, I left them to crust over a bit while I went to Michaels. 🙂

20130730-194202.jpg

Then I just piped swirls on the tops and sprinkled the tops with colored sugar.

20130730-194209.jpg

Mama-to-be and Daddy-to-be each got a special cupcake with the color hidden inside.

20130730-194214.jpg

The 3rd cupcake with the color was mixed in with the rest of the cupcakes and randomly distributed to their party guests. One lucky guest got the surprise center cupcake announcing to everyone that they’re having a BOY!!

20130730-194448.jpg

These cupcakes were super fun to make and fun to be able to know before the excited parents to be!

**

I posted the cored-out cupcake picture above (without the color) on my Instagram to tease the Mama-to-be, and just said something like “Making gender reveal cupcakes” …. and I didn’t even think about it but everyone thought it was MY reveal! Haha, nope – sorry guys, mine is going to be a surprise when Baby comes!!!

8 Comments

Filed under Cakes

Reese’s Peanut Butter Ice Cream Cake

My brother joined the navy earlier this year. We are very close – he actually has lived with me for most of the last 3 years.

He came to town on leave to surprise me. He’s been gone for 6 months, and this was the first time in our lives we’ve been away from each other for more than a couple weeks. It was a really good surprise, I cried for like 20 minutes straight. My sneaky husband knew everything and got it all on video. 🙂

While he was here we had a big family BBQ so everyone could see him. I (of course) asked to bring dessert. My brother is after all my best fan tester.

I had been eyeing this cake by Lindsay for a while now, and I knew an ice cream cake would be a perfect summer BBQ dessert that would impress not only my brother, but the entirety of my sweets loving family.

I decided to switch up her recipe a bit. Mostly because (and I know I’m in the minority here) I don’t think caramel and peanut butter belong together. Both are fabulous and both pair perfectly with chocolate, but I like to keep them separate.

Also – this cake is SOOO easy to make. If you can bake a box of brownies, you can make this ice cream cake!

20130813-104022.jpg

Reese’s Peanut Butter Ice Cream Cakeadapted from Life, Love and Sugar

Ingredients:

1 box brownie mix, plus ingredients called for on box (I used fat free brownies)

8 oz brick cream cheese (I used 1/3 less fat)

1/4 cup milk

1/2 cup sugar

1 1/2 cups creamy peanut butter

8 oz Cool Whip, thawed (I used fat free)

Chocolate Syrup

Large bag Reese’s Miniatures, unwrapped and chopped

20130813-104117.jpg

Directions:

1. Bake brownies in greased 13×9 pan, but reduce baking time to only 20 minutes. Let cool completely.

20130813-103845.jpg

2. With stand mixer or electric hand mixer, beat together cream cheese, milk, sugar, and peanut butter until completely combined.

20130813-103925.jpg 20130813-103932.jpg

3. Carefully fold Cool Whip into peanut butter mixture.

20130813-103940.jpg

4. Top cooled brownies with 1 cup of chocolate syrup. Spread all the way to the edges.

20130813-103907.jpg 20130813-103950.jpg

5. Drop chopped Reese’s on top of the chocolate syrup in an even but hearty layer.

20130813-103956.jpg

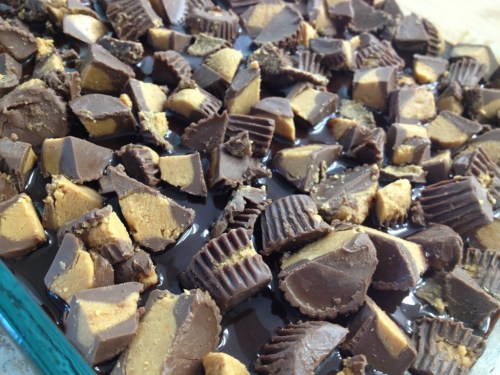
6. Cover Reese’s in peanut butter mixture and spread smooth.

20130813-104006.jpg

7. Cover entire pan in plastic wrap and freeze at least 4 hours, or overnight.

8. When ready to eat, cut cake into squares and top each square with more chocolate syrup and chopped Reese’s.

20130813-104016.jpg

20130813-104022.jpg

This cake is extremely rich. My brother and my family loved it. Honestly it was a little bit too rich for me to handle, but I’m not a huge chocolate fan anyway so don’t necessarily take my word for it. 😉

I used fat free/low fat everything I could for this recipe. I figured why not – there’s enough sugar in it anyway it’s definitely not going to be low on flavor! Feel free to use the full-fat version if you prefer!

20130813-103918.jpg

4 Comments

Filed under Brownies, Cakes, Misc

Perfect M&M Cookies

I found this amazing pin which led to this amazing blog post by Tessa over at Handle the Heat. It’s the first I’ve ever seen her blog, but after poking around a little I will definitely have to spend more time there!

Basically Tessa took the most basic chocolate chip cookie out there (the Nestle Tollhouse Recipe on the package) and made 9 batches of cookies. Each time she changed just 1 different element in the recipe to see what effect it had on the cookies. Very interesting!

After reading through all her notes I decided to create my own modification from the Tollhouse basic recipe with a couple of her variations. I have to say – the result is pretty perfect!!

Perfect M&M Cookies

Ingredients:

3/4 cup granulated sugar

3/4 cup packed brown sugar

2 sticks (1 cup) salted butter

2 tsp vanilla

2 eggs

1 tsp salt

1/2 tsp baking powder

1/2 tsp baking soda

2 1/4 cup flour

2 cups plain M&M’s (or 1 1/2 cups M&M minis)

Directions:

1. Put sugars into large bowl and top with cut up butter. Add vanilla and beat until smooth.

2. Add eggs one at a time and beat well after each. Scrape bowl and beater, then turn mixer back on low.

3. Add salt, then baking soda and powder. Slowly add flour until all incorporated.

4. Mix in M&M’s by hand.

5. Refrigerate for at least a couple hours, but better if overnight. This part is torture, but trust me – the flavors meld together and become much richer when it’s given time to rest.

20130730-194513.jpg

6. Scoop balls about 1 1/2 tbsp , then flatten with palms. Bake at 350* spaced well apart on a parchment lined cookie sheet for 9-10 minutes.

20130730-194524.jpg

**The first batch I only baked 2, and checked on them after 8 minutes, then 9 minutes, and again at 10 minutes. I really really didn’t want to over bake them. At 10 minutes they edges were brown, and the center was big and puffy.**

20130730-194529.jpg

7. Once done baking, let the cookies cool completely on the cookie sheet. The puffy tops will flatten out and since the centers are slightly under baked, this helps them set up. Once they’re cool, they can be moved.

20130730-200752.jpg

These cookies are slightly crispy on the edges and soft ad perfect in the middle. And how much more fun are M&M’s than boring chocolate chips!? Since I’m not a huge chocolate fan, the ooey-gooey chocolate chips are always so rich I can only handle like one cookie. But since the candy coating surrounds the chocolate, they are just perfect! I wanted to eat the whole pan!

2 Comments

Filed under Cookies