Tag Archives: chocolate

Fudgey Brownies with Chocolate Chip Cookie Dough Frosting

That might be my longest titled treat yet.

Don’t worry, it’s worth it.

Just as a disclaimer, the cookie dough frosting does not have eggs in it – so while it tastes just like raw cookie dough, it won’t kill you. At least not from salmonella. I can’t promise it won’t if you eat the entire bowl of it with a spoon. That’d be a good way to go though, I must say…

20121219-121025.jpg

Fudgey Brownies with Chocolate Chip Cookie Dough Frosting

Brownie Ingredients:

2 1/2 sticks unsalted butter (1 1/4 cups)

2 1/2 cups granulated sugar

2 tsp vanilla

4 eggs

1 cup flour

1 3/4 cups cocoa powder

1/2 tsp salt (omit if using salted butter)

Chocolate Chip Cookie Dough Frosting Ingredients:

1 1/2 sticks unsalted butter

3/4 cup brown sugar

1/3 cup granulated sugar

2 tsp vanilla

1/2 tsp salt

scant 1/2 tsp baking soda

1 1/2 cups flour

about 2 tbsp milk

3/4 cup mini semi-sweet chocolate chips

Directions:

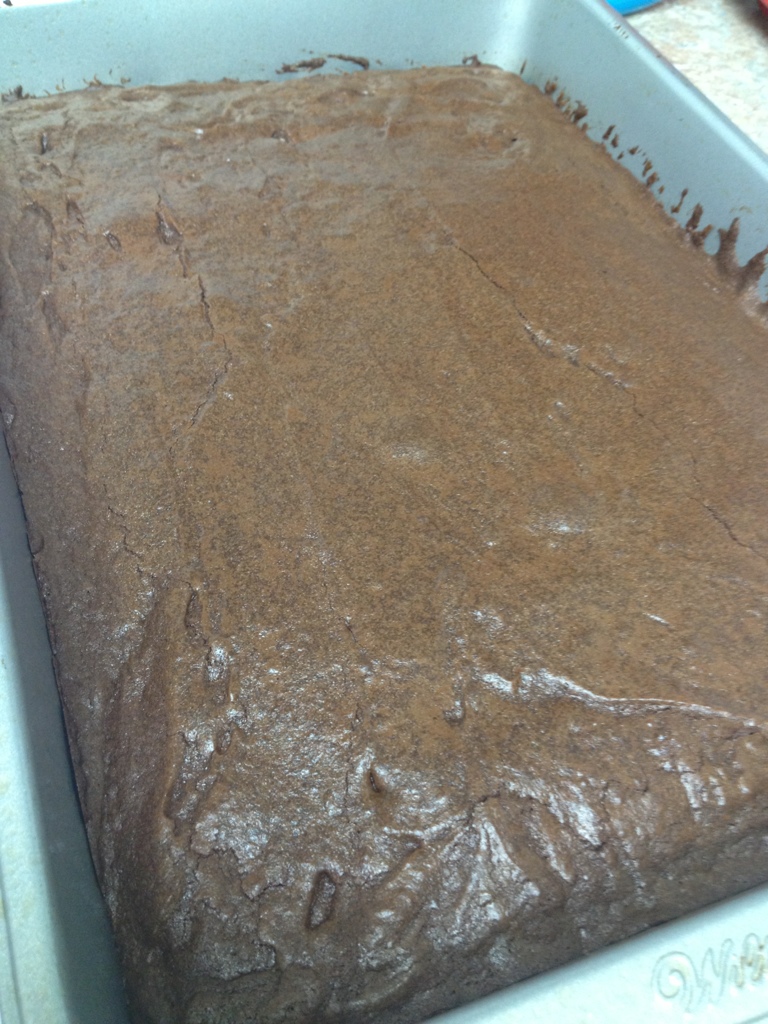
1. Preheat oven to 325*. Spray 13×9 pan with non-stick cooking spray.

2. Melt butter, then beat with sugar until mixed well. Beat in eggs and vanilla.

3. In a separate bowl, whisk together flour, cocoa powder, and salt. Slowly add to sugar mixture until mostly incorporated. Batter will be thick.

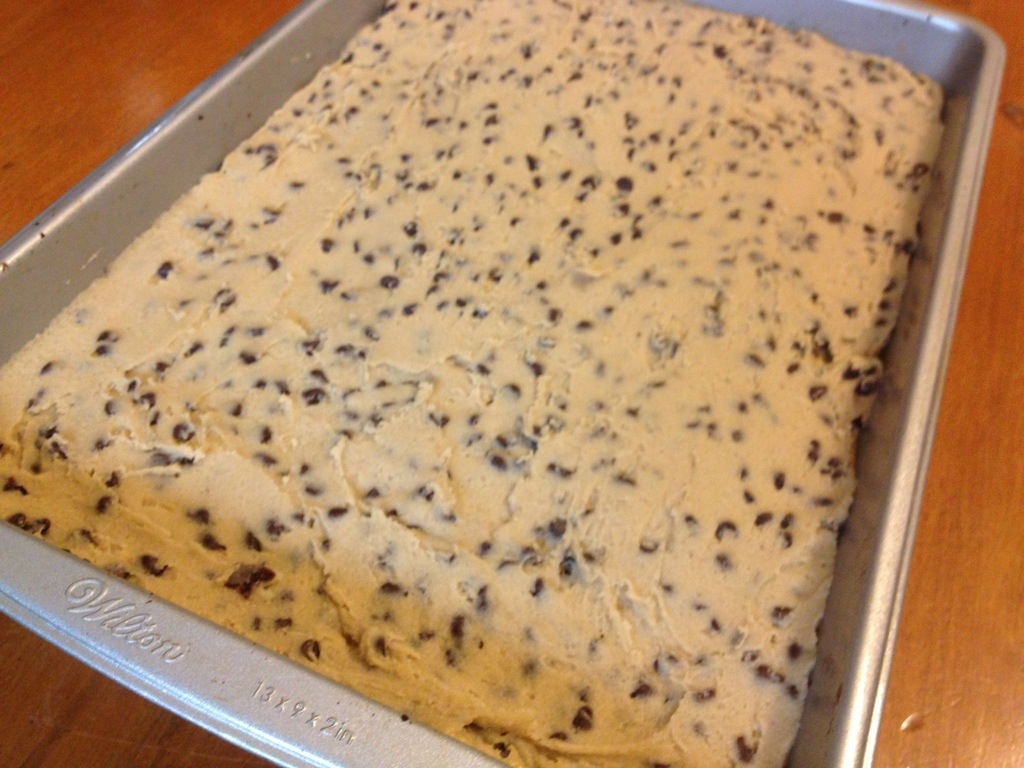
4. Pour into prepared pan and smooth out as much as possible.

5. Bake for 30 minutes (toothpick inserted into center should be mostly clean). Let cool at least 20 minutes.

**While brownies are baking, make the frosting.**

20121219-120950.jpg

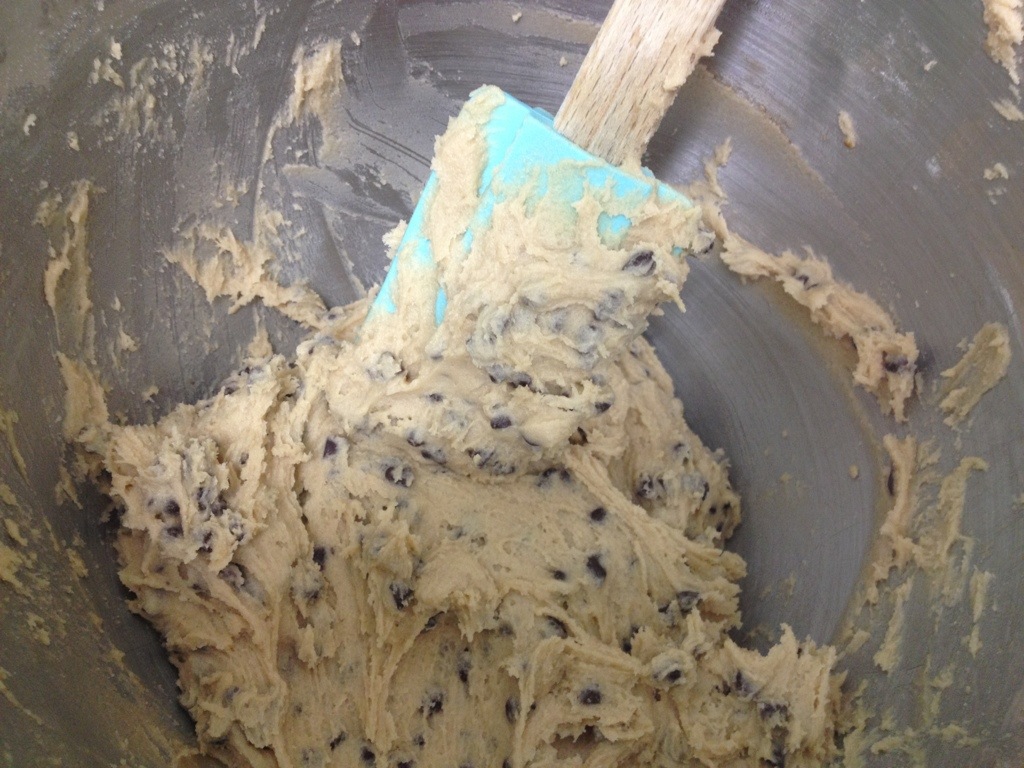
6. Beat together sugars and butter. Add vanilla, then salt and baking soda. Add flour 1/2 cup at a time, alternating with a little of the milk to keep it from getting too thick. Add more milk at the end if necessary to bring it to a thin enough consistency. Mix in the mini chocolate chips by hand.

20121219-120955.jpg

7. When the brownies are cooled, spread the cookie dough frosting evenly across the top with an offset spatula.

20121219-120959.jpg

8. Cover and refrigerate overnight.

20121219-121004.jpg

9. The next morning, cut the brownies into small pieces. It was easier for me to cut one whole row, then move it to my cutting board to cut into small pieces.

20121219-121020.jpg

10. Try not to eat the entire pan.

20121219-121030.jpg

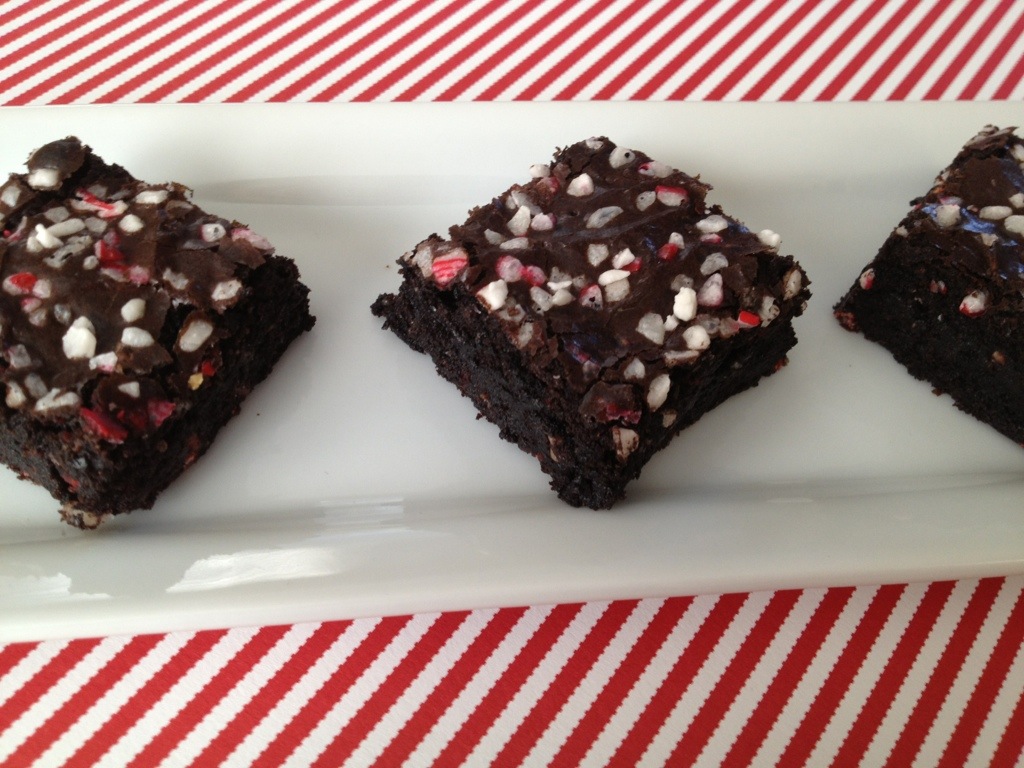
This is basically the same brownie recipe I used for my Dark Chocolate Peppermint Brownies. It’s fudgey and dense, and just rich enough to hold up the cookie dough well.

From the words of one of my coworkers, these are “amazeballs.” For the record, it’s the first time I’ve ever heard him say that word.

6 Comments

Filed under Brownies

Gingerbread House Decorating Party

Growing up, I got to decorate a gingerbread house ever single year. My grandmother spent hours and hours baking the house pieces so that my cousins, my brother, and I could enjoy the tradition. She made real gingerbread and real royal icing with egg whites. We took pictures with our houses every year and it’s so fun to flip through them all!

Now that I am grown up, I knew it was my turn to start my own tradition. I found Wilton gingerbread house cutters at Michaels. I baked chocolate cookies (my friends and I are not fans of actual gingerbread) and I made royal icing for the first time. We all brought lots of candy and went to town!

Here is my finished house:

20121209-154615.jpg

20121209-154629.jpg

20121209-154620.jpg

20121209-154635.jpg

20121209-154640.jpg

Here are the houses my girlfriends made…

I just love the way Chelsea did her roof!

20121209-154650.jpg

Michelle got so creative with her Santa and elves on one side, and a snowman on the other side.

20121209-154700.jpg

Here is my brother’s girlfriends’ house. Her grinch is so cute!!

532031_10151304453034863_1937177937_n

The chocolate cookies held up perfectly against the weight of the rest of the house plus all the frosting and candy.  And my first time making royal icing was a success, woo hoo! I do think I overbeat it, but it still hardened well and held up against the weight. Thanks everyone for the encouragement!

6 Comments

Filed under Cookies, Misc

Chocolate Snowflakes

These chocolate peanut butter cookies are decorated with all white vanilla buttercream. I just love the way the designs pop against the dark cookie!

20121204-220504.jpg

I decorated each snowflake with a unique design.

20121204-220514.jpg

I thought I would run out of ideas, but I just kept making them up as I went along.. my husband helped design a couple. (The bottom left snowflake in the pic above was partly his design.)

20121204-220509.jpg

These are my personal favorites:

20121204-220521.jpg

They even look cute all together…

20121204-220526.jpg

Here is my buttercream recipe. It’s very easy and adaptable and perfect to top any cookie!

14 Comments

Filed under Cookies

Dark Chocolate Peppermint Brownies

Happy Christmas season everyone!!!

I have been itching to make Christmas desserts for a while now, and I have been listening to Christmas music for weeks. It is my firm belief that Thanksgiving is about food and family (and football if you ask my husband), and about being thankful for all that we have. To me, Christmas means much the same, with the addition of giving and sharing. It is just another step in the holiday season and there’s nothing wrong with Christmas decor/excitement/music/shopping coming before Thanksgiving. (I know Jennifer agrees with me!) My husband definitely does NOT agree, but he did bring in my decoration boxes last night, so I can officially get going into the holiday spirit properly.

To celebrate, I made brownies! Dark Chocolate Peppermint Brownies. Because nothing screams Christmas like the classic combo of chocolate and peppermint.

I found these gems at Cost Plus World Market right before Halloween. Snatched them up with the thoughts of brownies immediately!

20121123-114358.jpg

I saw the Andes chips at Walmart last night so I know you can get them there too. (Yes I was at Walmart on Black Friday Thursday at 9pm. I survived. But for the record, I didn’t buy a thing – I will not give Walmart my money. I was with others who needed to get things there.)

Dark Chocolate Peppermint Browniesadapted from Smitten Kitchen

20121123-113308.jpg

Ingredients:

1 stick (1/2 cup) + 2 tbsp unsalted butter

1 1/4 cups sugar

1 tsp vanilla

2 eggs

3/4 cup + 2 tbsp special dark cocoa powder

1/2 cup flour

1/4 tsp of salt (omit if using salted butter)

1/2 package peppermint baking chips

Directions:

1. Spray 8×8 (or 9×9) pan with non-stick spray. Preheat oven to 325*.

2. Melt butter in microwave. Beat with sugar until it becomes a grainy paste.

3. Beat in eggs and vanilla.

4. In a separate bowl, whisk together flour, cocoa powder, and salt.

20121123-114408.jpg

5. Slowly add to sugar mixture until mostly incorporated. Batter will be thick.

6. Mix in peppermint chips by hand. Pour into prepared pan and smooth out as best as possible. Sprinkle with crushed peppermint candy if desired. I desired.

20121123-114403.jpg

7. Bake at 325 for 30-35 minutes or until toothpick inserted in the center comes out mostly clean.

8. Let cool completely to set before cutting.

20121123-113313.jpg

I thought the chips would completely melt into these, but you can see some of them peeking through in my taste tester below. The peppermint flavor and smell magically soaked into the brownie itself too. It was just the perfect punch of peppermint without being overpowering.

The brownies themselves were dense but not super fudgy. Not cakey either. Almost like a dense, thick, rich cookie. Unlike any brownie I’ve ever had. They’re pretty spectacular.

20121123-113303.jpg

Make these and get into the Christmas spirit with me!

5 Comments

Filed under Brownies

Fall Leaf Cookies

I tried a few new things with these fun fall leaves!

Instead of doing regular sugar cookies, I wanted to do my leaves dark so that the fall colors would really pop. For these I used Bridget’s Chocolate Peanut Butter recipe. They are very yummy!

Normally, I roll my cookies very thin. Most cookie decorators roll 1/4 inch or 3/8 inch thick. That is crazy to me! My cookies are typically less than 1/8 inch thick. I wanted to try doing thick one time to see how I liked it. They look cute thick, but personally I just prefer a higher icing to cookie ratio. 🙂

The third new thing I tried with these was the way I iced them. Normally I outline, flood, detail, etc. Recently I tried pouring the icing over the cookies. This time I dipped them, and let the excess drip off and down the sides. And since I was doing fall leaves in bright fall colors, I swirled the icing. It was fun and each cookie turned out completely different!

20121121-082550.jpg

20121121-082555.jpg

20121121-082559.jpg

20121121-082604.jpg

Excuse the poor lighting in these photos, it was rainy and yucky this morning!

20121121-082611.jpg

20121121-082616.jpg

20121121-082620.jpg

12 Comments

Filed under Cookies

Yellow Chocolate Lava Cupcakes

Have you ever had a chocolate lava cake? Basically, it’s a chocolate lover’s dream. Moist, warm, dark chocolate cake with a hot, gooey, chocolate ganache center.

This recipe was originally posted as the standard Chocolate Lava Cupcake by Ruthanne of easybaked. I just loved the idea, but I don’t like chocolate much, so I decided to switch it up.

Yellow cake and chocolate are one of the best pairings that exist in the dessert world. So why not flow that chocolate lava from yellow cake instead of more chocolate?

I hope I’ve convinced you.

Yellow Chocolate Lava Cupcakes – recipe adapted from easybaked

Ingredients

1 box yellow cake + water, eggs, and oil to make

1 cup semi-sweet chocolate chips

1/2 cup heavy whipping cream

1/4 cup cocoa powder (I used special dark)

1/2 cup dark chocolate candy melts (or semi-sweet choc. chips)

Directions

1. In a small bowl, combine heavy whipping cream and chocolate chips. Melt in the microwave, stirring every 30 seconds until smooth. Refrigerate at least 2 hours, or until firm. (I left mine in the fridge for 3 days before I had time to make these.)

2. Using a tablespoon, grab a hunk of hardened ganache and roll into a small ball. Roll ball in cocoa powder and set on a wax lined baking sheet or plate. (Makes about 18-20 balls.) Leave in the fridge until ready for use.

**This step was a little messy!

3. Make cake batter according to box directions, using a little less water than the recipe calls for. (I didn’t do this, and my batter was a little too thin. You’ll see why at the end.)

4. Preheat oven to 350*.

5. Scoop or pour batter into cupcake liners to about 1/3-1/2 way. Drop a ganache ball into each cupcake.

6. Pour or scoop just enough batter over the ball to cover completely.

7. Bake according to package directions, or until tops of cupcakes are dry and spring back to the touch.

8. Melt candy melts or chocolate chips in a zip top bag for 30 seconds. Massage with your fingers until completely smooth, melting for another 15 seconds if necessary. Cut the corner of the bag and squeeze chocolate drizzle on top the cupcakes.

9. Let cool about 10 minutes, then eat one warm. TRUST ME on this.

**Best served warm. If not serving immediately, heat in the microwave for 15-20 seconds before consuming. You want the lava flowing!

My cake batter was a little too thin, so my chocolate lava ball sank completely to the bottom.

Of course this didn’t effect the taste at all, it just required the use of a spoon or fork to eat. Which worked out well because the liners I used are sturdy and held up like a cup.

Whether you’re a chocolate lover or sometimes liker, I hope these cupcakes have converted some of you to the yellow chocolate lava side!

My coworkers LOVED these.

My best and most reliable cupcake judge (hi Terrence!) said “that was reeally special.” And then he told me he has to go to the gym tonight now. Haha…

4 Comments

Filed under Cakes

Muddy Buddy Fudge

So everyone knows what Muddy Buddies are, right? Some people call them Puppy Chow. My mom always called it reindeer poop. (Gross, but whatever…)

Anyways, I made this amazing fudge that tastes just like Muddy Buddies!!

I started with a recipe that I am hesitant to even link up, because it’s not really a recipe exactly… it’s a hilarious (but crude) pin I found one day on Pinterest. Click here if you really want to see it. There’s no one to site, but I adapted it anyway so here is my recipe. 🙂

20121109-083518.jpg

Muddy Buddy Fudge

Ingredients:

1 (14oz) can sweetened condensed milk

1 lb semi-sweet chocolate chips

1/2 cup smooth peanut butter

1 tsp vanilla

Directions:

In a large bowl, combine sweetened condensed milk, chocolate chips, and peanut butter. Melt in 30 second intervals, stirring in between to make it smooth.

20121109-083459.jpg

When it starts to thicken up and get harder to stir, add the vanilla and stir to get it all mixed in there.

Spray a pan with non-stick cooking spray. (I used a 13×9 and my fudge was pretty thin. A 9×9 would make a nice thick fudge.) Dump the fudgey mixture into the pan and press it down evenly. Let chill for at least an hour or until firm.

20121109-083512.jpg

Cut into squares and enjoy!!

**If you want to leave out the peanut butter because of allergies (let’s face it – no one really dislikes peanut butter, do they?!), it will still be a good regular fudge recipe!

20121109-083506.jpg

5 Comments

Filed under Candy

Chocolate Chip Blondies

I recently made some blondies that were… not so great… so then I decided I needed to keep trying blondie recipes until I found heaven. Because I knew it had to exist out there.

It didn’t take long.

Just this recipe, the very next recipe I tried after the failed ones.

These are basically a blondie base. You can add literally whatever you want to them. I can’t wait to try another batch!

Also – I threw the batter together in like 5 minutes. Not joking.

20121029-194804.jpg

Chocolate Chip Blondies – recipe adapted from Smitten Kitchen

Ingredients

1 stick butter (I use salted)

1 cup brown sugar (I used light)

1 egg

1 tsp vanilla

pinch of salt

1 cup flour

1/2 cup chocolate chips

Directions

1. Preheat oven to 350.

2. Melt butter. Beat with brown sugar until smooth.

3. Beat in vanilla and egg.

4. Add salt, then stir in flour until fully incorporated.

5. Mix in chocolate chips.

6. Spray a 8×8 pan with non-stick spray, then pour batter into pan. Make sure it’s as even as possible.

7. Bake for 20-25 minutes, or until center is set. (Mine took 25 minutes.) Let cool completely before cutting so that the ooey gooey inside can set.

Heaven!!

20121029-194810.jpg

Look at that shiny cracked crust… that ooey gooey center…  okay, I’m going to make some more of these now.

Please try them!

3 Comments

Filed under Misc

Anniversary Sweets

My coworker Jaz asked me to make sweets for his wife for their 3rd anniversary. He said I could make whatever I wanted! He had not yet tried my cookies, so I definitely wanted to include some cookies… and then I thought, what is more romantic than chocolate covered strawberries?! Together they would make a cute little love tray.

Here is the picture I used for color inspiration (since he had no idea what colors would be good)…

20121015-211103.jpg

… and here are my colors. My pink came out a little more purple, but I still love how they looked together.

Here are the cookies. I stuck with hearts. Cuz they’re all lovey and stuff.

and the romantic strawberries…

On a side note, I know 3 people (they happen to all be men) who don’t like chocolate covered strawberries. Why you might be wondering? Because they don’t like strawberries. WHAT? How is that even possible? They must be aliens or something.

What a lucky lady you have, Jaz!


12 Comments

Filed under Cookies, Misc

Cherry Chocolate Dr. Pepper Cupcakes

My coworker Apryle invented these, and I promised I would make them for her.

This is a soda cake.

I made soda cupcakes once before (Orange Soda Cupcakes), so I was excited to try a new flavor combo.

Chocolate Fudge Cake + a can of Dr. Pepper. That’s it! (Literally – no eggs, water, oil, anything. Just a can of soda.)

Bake em up for 18-20 min at 350*.

For the Cherry Frosting:

1 lb powdered sugar

1 stick (1/2 cup) salted butter

3 tbsp milk

1 tsp vanilla extract

1 tsp cherry extract

red food coloring

Mix all ingredients until smooth and fluffy. Pipe or spread onto cupcakes.

My brother’s review of Apryle’s cupcake:

“The cherry is almost too overwhelming, but it works with the chocolate cupcake. The Dr. Pepper taste is subtle but it’s definitely there.”

….and Apryle’s review:

“The cherry is really sweet and the Dr. Pepper is subtle, but it was really good!”

4 Comments

Filed under Cakes