Monthly Archives: April 2012

“Better Than” S’mores

These little guys happened by chance.

I was making some cupcakes (you can see them here) and had some extra frosting. It is too good to waste, so I pulled out my grahams and piped blobs on them.

This frosting is sort of like a marshmallow but not.. It’s sticky and foamy and light, and after setting overnight it stiffens up just a bit. If marshmallows aren’t your thing because of the texture or because of the “animal” in the gelatin, then this frosting is your friend. It contains none of that.

20120424-093231.jpg

Then I was too lazy to actually melt chocolate, so I just threw a handful of chips onto each one.

20120424-104922.jpg

The grahams sort of staled overnight so they were soft and more like a cookie, less like a cracker. It worked out perfectly for these little morsels.

Best accident/chance dessert ever.

20120424-093245.jpg

I linked up to Shelly’s S’mores Party over at Cookies and Cups. If you want to check out some really cool s’mores treats, head on over!

1 Comment

Filed under Misc

Chocolate Dipped

There is something too perfect about chocolate dipped strawberries.

These I did for my aunt’s Oscars party (a while back!). First time I did little tuxes. Turned out pretty cute!

These were for a 15 year old girl’s birthday party.

20120312-113006.jpg

20120312-113011.jpg

20120312-113033.jpg

20120312-113042.jpg

20120312-113021.jpg

I also (finally) got around to dipping my peeps in chocolate. The week before Easter was crazy for me so I didn’t get to it in time. Peeps are a Spring thing not an Easter thing though right? Let’s go with that.


20120420-084403.jpg

I actually don’t even like peeps. But dip them in chocolate and you make heaven!!

20120420-084411.jpg

I love sprinkles. They make everything better. And prettier.

20120420-084418.jpg

Here are all of them together!

20120420-084341.jpg

I think this guy was my favorite. I got these pretty extra long jimmies at the 99 cent store right before Easter.

20120420-084423.jpg

10 Comments

Filed under Marshmallows, Misc

Popcorn Cookies

Here are some more popcorn cookies I did.

20120420-105414.jpg

These were for a 15 year old girl’s Movie Birthday Party.

20120420-110557.jpg

3 Comments

Filed under Uncategorized

Circus Birthday {Girl}

A couple days ago I posted another circus birthday, but for a boy. This time, the circus party was for a little girl.

I definitely wanted to do circus tents again, because I loved the way my last ones turned out.

20120414-214635.jpg

I recently bought a big assorted set of Wilton cutters. (Actually didn’t get too many duplicates, which was awesome! What does everyone do with all those duplicates anyway? I have a bag started..) Anyway, in it was a balloon cutter, and after seeing the balloon cupcakes for my last circus party, I thought the balloon would be a good addition to this cookie party.

20120414-214901.jpg

(If I weren’t doing these for 2 year olds, I would have stuck a sting to the back of each balloon with a dab of frosting. I figured 2 year olds wouldn’t know to pull it off so I just left it out.)

20120414-214536.jpg

I came across these adorable circus cookies by Nicole of Life’s A Batch a while back, and the mama for these cookies just loved them when I sent her the link. From these cookies I drew inspiration for the pink elephants.

20120414-214346.jpg

We also liked the idea for popcorn buckets. I had seen these by Bridget of Bake at 350 a while back, and I also loved the ones from Life’s a Batch, so I combined the ideas into something I could create with my style of frosting/icing.

For the actual popcorn kernels, I was having a hard time deciding what I wanted to do. First I tried using only icing, and planned on layering blobs to create “popcorn.” But because my icing is similar to glaze, it wasn’t holding it’s popcorn shape the way I wanted.

I scraped that idea (literally) and kind of “gave up” and turned to my trusty buttercream… just started creating my blobs. They were kind of bumping into each other and not really looking like kernels anymore.. They needed butter. Problem was, I didn’t have anymore buttercream to dye yellow for the butter. I definitely didn’t want to make a whole new batch just for a couple tablespoons needed. So I winged it and started using icing. Not something I’ve ever done before. I outline in buttercream, fill in icing, and use buttercream for details. Icing on top of blobs of buttercream? What the hell is that?

I’ll tell you. It’s butter. MELTED butter.

20120414-214849.jpg

Perfection. Accidental perfection.

20120414-215902.jpg

20120414-215956.jpg

20120414-214916.jpg

10 Comments

Filed under Cookies

Circus Birthday {Boy}

What are the chances? Two back-to-back circus birthdays for 2 year olds? One is for a boy and one is for a girl. You will see the girl’s circus birthday later this week.

I want to start by saying I LOVE the circus. I went every year as a kid. Even when I got older and didn’t yet have kids to take with me, I still loved to go. Oddly though, I don’t like clown stuff much. I don’t mind the actual clowns at the circus, but I don’t like clown dolls, pictures, figurines, etc. And I’ve never even seen It or Chuckie or anything scary. I don’t know, they just weird me out. Sometimes when I do to Chevy’s, there’s this clown there who makes balloons for the kids. She kinda creeps me out too. Maybe I just prefer a safe clown distance when they’re real.

Anyway, I didn’t make clown cookies. I didn’t have a good cutter… and what I was envisioning was not translating to paper well and not really “findable” through a google search. For some reason people think clowns in cookie form need to be wearing pointy party hats, although I’ve never seen a real-life clown wearing a party hat. Ever.

So I made circus tents. I found a few images through google search that I liked, but they were made with royal icing, so I had to adapt to my own style. Here is what I came up with:

20120409-082456.jpg 

20120409-082515.jpg

I am SO in love with how they turned out!

We also did some #2’s for the 2-year old birthday boy.

20120409-082509.jpg

I bagged them up to be favors, and attached these cute little tags the mama found. It’s hard to read in this pic but it says “Thank you for coming to my party.”

20120409-082525.jpg

20120409-082531.jpg

I also made cupcakes for this circus party. There were red yellow and blue striped cupcakes with cute little toppers…


…as well as a few balloon decorated cupcakes for a special display.


and here is a picture of the whole treat table!


6 Comments

Filed under Cakes, Cookies

Homemade Funfetti, Take 3

This is my third attempt at homemade funfetti. The previous attempted were somewhat dry, and did not resemble the perfect moist texture of a boxed cake mix.

I decided to start with a recipe that was created to mock a boxed cake mix, Glory’s Perfect Vanilla Cupcakes. This cake recipe calls for “cake flour.” Now seeing as I don’t sift my flour or powdered sugar, or let my butter properly soften, we all know I’m not going to go to the store to get a specific kind of flour. Luckily, Amanda from iambaker has a recipe for making your own cake flour. The recipe also calls for buttermilk. For the reasons noted above, I am not using buttermilk. Good thing you can make that too.

Homemade Funfettirecipe adapted from Glory’s Perfect Vanilla Cupcakes

20120325-210333.jpg

2 1/2 cups flour

1/4 cup + 1 tbsp cornstarch

2 1/2 tsp baking powder

1 tsp baking soda

1 tsp salt

1 cup milk

1 tsp white vinegar (or lemon juice)

4 eggs, room temperature

1 1/2 cups sugar

1 tbsp vanilla

1 cup vegetable oil

1/4 cup sprinkles

1. Preheat oven to 350*F. Generously coat 2 8″ or 9″ cake pans with cooking spray.

2. Measure the flour into a small mixing bowl. Remove 1/4 cup + 1 tbsp of the flour and return to your flour bag/bin/container. Add the cornstarch to the flour in the mixing bowl and whisk together well.

3. Add the baking powder, baking soda, and salt to the flour mixture and whisk together.

4. Measure the milk into a glass or small bowl and add the vinegar. Let stand for at least 5 minutes.

5. With your mixer, beat eggs for about 30 seconds. Add sugar and mix well. Add oil and vanilla and mix.

6. Add about half of the flour mixture, and beat until fully incorporated. Then add about half of the milk. Repeat with the rest of the flour, and then the rest of the milk.

20120325-210328.jpg


7. Quickly stir in the sprinkles by hand, then quickly split the batter between 2 8″ or 9″ pans.

8. Bake for 25-30 minutes. When cake is done, it should spring back to the touch, and a toothpick inserted in the center should come out clean. (Mine got a little over baked. It was still good but ended up being closer to a pound cake consistency rather than a boxed cake consistency.)

9. Let cool completely before removing from pans.

This cake was actually what I made for my final cake decorating class. So the outside is pretty too!

20120406-212048.jpg

20120406-212102.jpg

20120406-212126.jpg

20120406-212134.jpg

20120406-212141.jpg

2 Comments

Filed under Cakes

Key Lime Pie

I love key lime pie. I feel confident in saying it’s my favorite dessert.

I have never made it myself, but have always thought about it. After I bought these pans awhile back, I knew I would be making mini key lime pies with them.

I have had amazing key lime pie, and okay key lime pie… I don’t know if I’ve ever had a bad key lime pie… but I didn’t know where to start to get a good one. I did some online searching and learned there are a couple different ways to make it. Some use sweetened condensed milk (something I have never even purchased before), some have cream cheese, some use lime jello or limeade concentrate.

Based on texture, I decided to go with a sweetened condensed milk version. I found this recipe by JoyofBaking.com, and had to adapt it a little because of the available ingredients at my grocery store.

Key Lime Pie – adapted from JoyofBaking.com

20120409-101215.jpg

1 1/4 cup graham cracker crumbs

2 tbsp granulated sugar

6 tbsp butter, melted

3 large egg yolks, room temp

1 14oz can sweetened condensed milk

1/2 cup key lime juice (It takes about 20-25 key limes. I used the bottled stuff.)

2 tsp lime zest (you can use regular limes for this)

whipped topping of choice

1. Preheat oven to 350*. Spray bottom and sides of pan(s). You can use an 8 or 9 inch springform or pie pan, but I decided to use 3 4″ springform pans. It was the perfect amount of filling for my 3 pans.

2. Mix together melted butter, graham cracker crumbs, and sugar. Press into bottom and 1/2 up sides of pan(s). Bake for 5-10 minutes, or until it’s golden brown at the edges. (My mini pans only took about 5 minutes.)

3. While the crust is baking, grate the lime zest. My grocery store did not have key limes, so I bought bottled key lime juice and used regular limes for the zest. (It takes 20-25 key limes to get enough juice, so I don’t know that I would want to do all that extra work anyway.) I like my zest in smaller pieces, so I always chop it up after I zest it.

4. When the crust is done, remove to a wire rack and let cool. With your mixer and your whisk attachment (regular beaters are fine if you have a hand mixer) beat the egg yolks for 2-3 minutes. They should be light and frothy.

5. Open the can of sweetened condensed milk and slowly add to your egg yolks while the mixer is going. It should beat for about 3-5 minutes total. You want it to be light and “fluffy.”

6. Scape down the sides of the bowl and add the key lime juice and zest. Beat for a bit more, until the juice is fully incorporated. (I got a bunch of zest stuck on my whisk so I had to scrape it and mix a bit more by hand after I stopped the mixer.

7. Pour the filling into your pan(s), then bake for 10-15 minutes, or until the filling it set. Even with my little pans this took about 12 minutes.

**My mini pans were dripping in my oven, which ended up creating smoke by the time I took them out. Next time I would set them on a cookie sheet or something when I put them in the oven.

8. Let cool on a wire rack, then cover and chill overnight (or at least for a few hours).

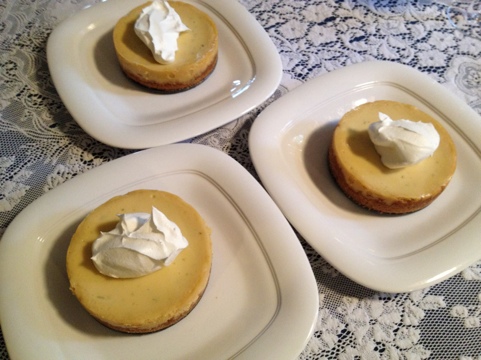
9. When ready to serve, remove the springform ring (if necessary) and top with a dollop of whipped topping. I just used the frozen stuff, thawed out. It was light and didn’t take away from the perfect tartness of this pie.


20120409-101207.jpg

I don’t think I ever need to try another recipe, this one was absolutely perfect! Very tart, smooth creamy texture, and a perfect crumbly crust. I used the bottled key lime juice, and it was easy and perfect. The recipe for key lime pie on the juice bottle was actually identical to this one. That’s how you know it must be perfect!

20120409-101226.jpg

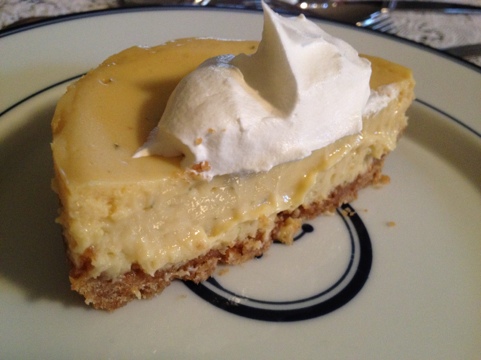
*Note* Real key lime pie is not green, but yellow. The juice (and the inside of a key lime) is like a pale yellow color. The egg yolks are yellow, and the sweetended condensed milk is yellowish. If the pie is green, food coloring was added.


20120409-101231.jpg

2 Comments

Filed under Misc

Carrie’s Creations Turns 1!

1 year ago today I started this little blog. It’s my blog “birthday” if you will.

20120408-214305.jpg

(My aunt made this cake for Easter. Nothing too fancy, just perfect funfetti. Nothing says birthday like funfetti!)

When I started blogging, I didn’t know much about it or what was even out there.

I realized how much I loved baking and creating treats and decided that I wanted a place to post and show the things I was making. I didn’t even really know what to say at first. I’ve been just learning as I go.

I had no idea that I would find so many amazing people online who do and love creating treats like I do. Especially cookies! It’s an entire blogging world all on it’s own. I have found so many lovely places to go for inspiration, creativity, and fun. (If you’d like to see my favorite sites, check out the link above.)

One of the amazing ladies I have met is Kendra of The Royal Cookie. She did the sweetest thing imaginable for me. She made me a cake for my first birthday!

Here is a sneak peak:

Go check it out here! How sweet is she?! I only wish I could have a slice, but unfortunately we’re on opposite ends of the country. 🙂

If you are a reader or a follower, I want to extend my deepest thanks. If you haven’t popped up and said hi, please do! I’d love to say hello or if you create as well I would love to check out your stuff! If you get my posts through email, click on the post title to go to the actual webpage. There you can easily leave a comment if you’d like!

If you make something you’ve found on my page, I would love to see it. Post a picture to my facebook wall, tweet me, or find me on intragram (CookieCarrie).

Many, many more treats to come… stay tuned!

3 Comments

Filed under Uncategorized

Easter Cookies

I love Easter colors!

20120406-081623.jpg

The butterflies are a new cutter I bought recently. Much cuter than the round-winged Wilton butterflies I had before.

20120406-081522.jpg

20120406-081528.jpg

I wanted to make only eggs, but my friends (who I do a cookie decorating party with) wanted other shapes too…)

20120406-081549.jpg

20120406-081554.jpg

20120406-081542.jpg

I love sprinkles. It’s like glitter. Makes everything better.

20120406-081535.jpg

The rest were done with stencils and Wilton color spray.

I icing them solid white…

20120406-081635.jpg

Then layed out the stencil on top (sorry no picture)…

Then went outside because the color spray flies everywhere… and kept spraying until it got a nice dark color. Waited a few minutes, then removed the stencil to find these beauties! 

20120406-081605.jpg

I bought my stencil on Amazon. This paticular one can be found here.

20120406-081611.jpg

And this is why my husband does not help me decorate… 


20120406-081646.jpg

…and yes there is a “base coat” of sprinkles under the icing…


5 Comments

Filed under Cookies

Peacock Martinis

Last week I got to make cookie favors for the bridal shower of my husband’s coworker. The bridal shower was cocktail themed and the wedding colors are teal green and bright purple. (With peacock feathers!) I was so excited to make these.

I chose martinis because nothing screams “cocktail party” like a martini. Here is what we came up with:

20120402-105657.jpg 

First I outlined just the glass and background, then I squeezed a bit of uncolored icing (so that it would dry somewhat clear) into the rim of the glass.

20120402-105605.jpg

While that dried, I filled in the background. I think the color turned out a little lighter than the wedding color, but I got it as close as I could. 

20120402-105613.jpg 

Then I filled the glass with the cocktail…

20120402-105624.jpg 

Lastly I re-oulined the glass and piped on a stem and base.

20120402-105633.jpg 

Tied them up with a ribbon and they were good to go! 

20120402-105645.jpg 

Too bad they’re not real martinis, I bet they would taste delicous!!


**UPDATE**

Here are some pictures from the party these were for!

1 Comment

Filed under Cookies